Swift You and I
A blog about SwiftUI and related Apple ecosystem technologies
Since its inception SwiftUI has provided us with automatic line-wrapping within text views as well as for concatenations of text views. But there is nothing equivalent that can be applicable to mixed arbitrary views. This is however possible in UIKit by way of collection views configured with what is called a flow layout object. Here we are taking a different approach. Read on to find out!
Instead of relying on UIKit we want to implement this in a SwiftUI native kind of way. This means basing our solution on stacks. What we really want is a regular HStack that would split itself into multiple instances whenever its content is too wide to fit its width. For this we need to calculate a priori how many lines we need to fit in all of the content. Once we have this information we can group all of the horizontal stacks in a single top-level vertical stack.
So we start by mimicking the native stacks' API as closely as practically possible. We should be able to handle all the wrapping logic internally. For this we are going to create a new WrappingHStack view type with similar semantics to HStack which we will use roughly like this:
WrappingHStack (
  alignment: .bottom,
  spacing: 8,
  content: [
    Rectangle().fill(Color.red).frame(width: 100, height: 50),
    Rectangle().fill(Color.red).frame(width: 50, height: 100),
    Rectangle().fill(Color.red).frame(width: 150, height: 75)
  ]
)
So we are trying to fit three rectangles of different widths in as many lines necessary. For simplicity we are declaring the content a [View] array instead of implementing the ViewBuilder function builder. Heterogeneous views can still be mixed and matched by wrapping each one of them with AnyView.
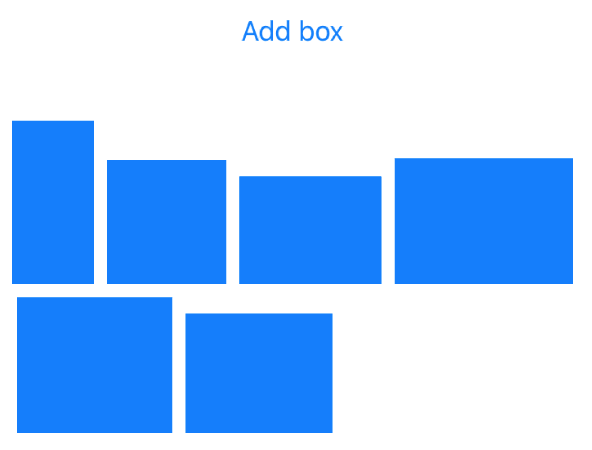
Before we can start actually measuring the items let’s take the sample call above and hard-code some values into our WrappingStack. In this case we are going to need two lanes. We are also going to keep track of when a contained item belongs to a new lane using an array of indices which we’ll call bounds. The total number of lanes will always equal the bound array’s count.
struct WrappingHStack<Content: View>: View {

  var alignment: Alignment
  var spacing: CGFloat
  var content: [Content]

  var laneBounds: [Int] {
    [0, 2] // First  lane starts with rectangle number 0. Second line starts with item number 2
  }

  var totalLanes: Int {
    laneBounds.count
  }

  var body: some View {
    VStack {
      ForEach(0 ..< totalLanes, id: \.self) { i in
        // Lane
        HStack(alignment: alignment.vertical, spacing: spacing) {
          // Lane items
          ForEach(lowerBound(lane: i) ..< upperBound(lane: i), id: \.self) {
            content[$0]
          }
        }
        .frame(maxWidth: .infinity, alignment: Alignment(horizontal: alignment.horizontal, vertical: .center))
      }
    }
  }

  func lowerBound(lane i: Int) -> Int {
    laneBounds[i]
  }

  func upperBound(lane i: Int) -> Int {
    i == totalLanes - 1 ? content.count : laneBounds[i + 1]
  }
}
So what we have really done is loop over the total number of lanes generating multiple HStack instances inside the top level vertical stack. For each horizontal stack we loop over the content elements within the bounds of that particular lane and populate it. A two-axis alignment is taken as parameter and later split into a per-lane vertical alignment and a frame’s horizontal alignment.
Now we are finally ready to start making those bounds dynamically generated.
To obtain each element’s dimensions we are going to borrow from UIView’s intrinsicContentSize .For this we’ll need to wrap our individual SwiftUI views in a UIHostingController. But don’t worry, this ephemeral controller exists only for measuring purposes and will not be rendered as part of our view hierarchy.
As an example, this is how we would measure a 100 by 50 rectangle:
UIHostingController(rootView: Rectangle().frame(width: 100, 50)).view.intrinsicContentSizeWith the result being unsurprisingly a 100 by 50 points size object.
Now to determine when a lane has been filled with enough elements we’ll need a maximum width. If the sum of all the item widths exceeds the maximum lane width, then we can go ahead and create the next lane. To get a suitable value we leverage GeometryReader and apply it before instantiating our wrapping stack:
@State private var height: CGFloat = 0

var body: some View {
  GeometryReader { p in
    WrappingHStack (
      width: p.frame(in: .global).width,
      alignment: .top, spacing: 8,
      content: […]
    )
    .anchorPreference(
      key: CGFloatPreferenceKey.self, value: .bounds,
      transform: { p[$0].size.height }
    )
  }
  .frame(height: height)
  .onPreferenceChange(CGFloatPreferenceKey.self, perform: {
    height = $0
  })
}
We use the reader’s global width and pass it down to WrappingHStack for later use. And given that the mere introduction of the geometry reader modifies the frame we are forced to use the anchorPreference modifier to keep our height tight.
Now we can at last iterate over the elements to determine exactly what the bounds for each lane will be.
To dynamically generate our bounds array we start by applying reduce on our content. On each step we are going to measure the current item’s width – using the special technique described earlier – and accumulate those values until the lane is full. Each time we complete a lane, we insert an additional index element into our resulting bounds array:
var laneBounds: [Int] {
  let (laneBounds, _, _) =
    content.reduce(([], 0, width)) {
      (accum, item) -> ([Int], Int, CGFloat) in
      var (laneBounds, index, laneWidth) = accum
      // Let's measure the item's size
      let itemWidth = UIHostingController(rootView: item)
        .view.intrinsicContentSize.width
      if laneWidth + itemWidth > width { // Lane full
        laneWidth= itemWidth
        laneBounds.append(index)
      } else { // Lane not full yet
        laneWidth += itemWidth + spacing
      }
      index += 1
      return (laneBounds, index, laneWidth)
  }
  return laneBounds
}
By always keeping track of the accumulated lane width we can determine whether we are going to surpass that limit before adding the current element. In which case we append the current element’s index to the bounds array. This way we end up with the set of indices that limits the contents of each horizontal stack.

This is a pretty straight-forward way of gaining automatic line-wrapping capabilities for our layouts without ever leaving the SwiftUI framework. The knowledge from this article has been incorporated into SwiftUILib’s Wrap-Stack library available as a Swift Package for everyone to enjoy.
That’s it for now, as always check out the associated Working Example for the complete source code and interactive demo.